So close, and yet so far
Yesterday was a full day at the garage. We started early, heading out for breakfast at eight at a favorite local restaurant. Revitalized with corned beef hash and eggs, we then headed to the garage. While my dad set up, he (much to my reluctance) had me read all the instructions for engine disconnection and removal before we started.
Once Dad and I were fully ready to begin, we headed out for quick haircuts. On the barbershop TV, we were shocked to see Johns Hopkins’ defense obliterated in a lacrosse game against Duke. The final score was 18-5, Blue Devils.
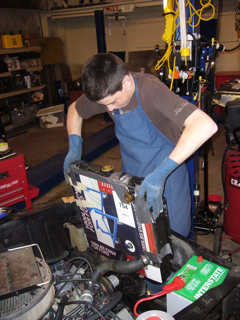
Back to the garage. I started by taking off the air cleaner, then draining and removing the radiator. To protect the core fins, we cut a square out of the cardboard box that held our engine cradle, and taped it to the side of the radiator. After removing the fan and throttle linkage, we started on hoses and wires. The book, and my dad, were very clear in their reminders to take many pictures and flag wires with masking tape for reference. There were hoses leading to the power brake booster, the carburetor, the intake manifold, and many other places. As for electrical wires, there was a wiring harness that ran along the inside of the left valve cover, with many wires spreading out. The most difficult part was removing the starter motor cable, because it was connected to the bottom of the block with a bracket. Next off came the power steering booster.
Then, we took a break to go to an end-of-the-year party for my lacrosse team. We had fun passing a ball around, and Coach awarded me Best Team-Player (in other words, most helpful). We returned to the garage after dinner. Having applied a penetrating oil a couple of hours before, Dad and I painstakingly removed the bolts connecting the exhaust manifold to the block (a small-block V8 leaves very little wiggle room in between the engine and the compartment walls). At this point, we jacked up the car to access the bottom bolts connecting the exhaust pipes to the manifolds. Exhaust manifolds out, Dad removed as many bell-housing bolts as possible from the top, and then sent me under the car to finish the job. After doing some research to find out where the converter was, we discovered that our car had no converter cover to remove. Next, the book said to crank the engine with a remote starter to spin the converter and show the converter-to-crankshaft fasteners. Removing the alternator was the last step before engine removal. We lowered the car and hung the engine load leveler on the cherry picker, but it was much past my bedtime by then, so we decided to call it a day.
We won’t be able to finish until Dad returns from his business trip to London. In the meantime, I brought back a bin of small parts and fasteners to catalog in our parts inventory.
Until next time…

Friday, May 21st 2010 at 5:53 pm |
hey Jack, your dad sounds like a real stickler–making you *read the manual* and mean stuff like that, huh? 8^)
Thursday, May 27th 2010 at 8:15 pm |
hey,this is Rocco Archer,just found your Post on google and i must say this blog is great.may I share some of the information found in the web site to my local students?i am not sure and what you think?in any case,Thanks!
Friday, May 28th 2010 at 4:05 pm |
nice post. thanks.