Moving forward

Posted February 24, 2013 By jack

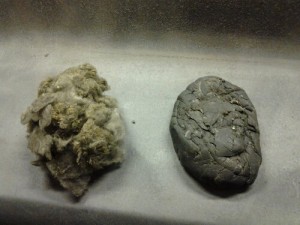
As expected, cleaning the car hasn’t been the most enjoyable part of the restoration, but after all, somebody has to do it. Glass abrasive appears to have caked itself over everything, even some areas that haven’t seen sunlight since the car was assembled back in ’69. Needless to say, it’s been tough work. In addition to the confounded glass, I had also neglected to scrape off the gummy adhesive that lines the windowsills and doorjambs when I removed the windshield and doors, so it was about time I tackled that task. Using a gasket scraper, I first removed all excess gunk on the car, before applying denatured alcohol to eliminate the residue it left behind. Since we’ll be painting the interior soon, I focused on the inside of the car, pulling all the remaining fiberglass insulation out of the roof as well as all the glass abrasive I could access.

The fruit of my labor: two sizable globs of fiberglass and window goop.

I’ve decided to leave the rear quarter panels alone. Should I, or any future owner down the line, decide to return the car to its original S-code specifications, re-replacing the panels to include the fake side scoops would be a significantly irksome task, considering it could have been avoided to begin with. Finally, there’s also the financial matter: the car will never be more valuable as a Boss 302 clone than as an original ’69 S-code.

The next few steps are to weld in the roll cage and sub-frame connectors, lead-in the left rear quarter panel seam, and have the underside, interior, and engine compartment painted. Looks like quite a bit of fun ahead of us yet!


Spring Cleaning

Posted February 6, 2013 By jack

Well, Dad’s off to Europe. He and a few of his buddies decided the American auto scene didn’t offer enough panache, so they’ve been living it up at the Retromobile in Paris, France. Meanwhile, I’m stuck at home with a car to restore.

image

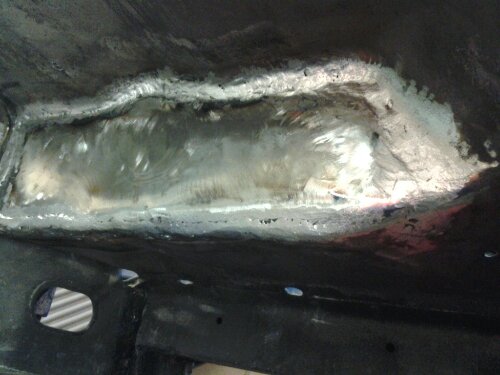
In the past few days at the garage, I’ve finished grinding down the welds in the battery tray area, which is now looking good as new. When I wire up the car later, I may decide to move the battery to the trunk for a more balanced weight distribution, in which case there would be no need to actually weld a tray to the metal. Originally, the battery rested on a small platform to keep sulfuric acid off of the metal surfaces (and that worked just swell), but that was rusted through and cut out with the rest of the metal.


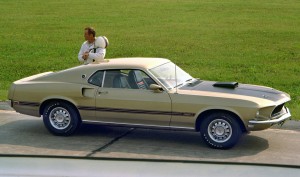
Next step is to go over every inch of the car and remove leftover glass abrasive and dust with an acid etching compound. As I clean up the car for final bodywork and paint prep, I’ll have to make some decision regarding the fake side-scoops in the rear quarter panels. My original plan had been to cut them out and weld in new metal, in keeping with the design of the 1969 Boss 302 I’m replicated, but today Dan the Muffler Man pointed out that the scoops are actually quite desirable, and removing them would diminish the value of the car. Thoughts, anyone?

(click for greater detail)

1969 Mach 1 w/ side-scoops

1969 Boss 302, sans side-scoops


Dan to the rescue

Posted January 28, 2013 By jack

Well, it looks like Dad’s welding mishaps were too difficult to fix after all. Since we didn’t want to inflict any more damage than had been done already, or delay our project any longer, we decided to leave it to the professional. Dan, who runs the muffler shop across the street from TLG, was kind enough to finish the job for us. He quickly patched up the blowout holes, and now all I have to do is grind down the excess metal. Next step: rear quarter panel replacement. These will probably be spot welded in place once the old ones are cut out. Dan told my dad that the 1969 Boss 302 had fake side scoops like ours, but I’ll have to run a fact check on that—I’m pretty sure I remember the Boss looking a bit more sleek.

Dan cleans up nicely


Back in business

Posted January 8, 2013 By jack

First post of the new year! This year I resolve to finish restoring the Mustang by my high school graduation on May 31, and if I put the pedal to the metal I might just do it.

We visited the garage last night for the first time in a while (my winter break was spent skiing). Dad and I worked to finish the job we had started by filling in the remainder of the holes around the battery tray we fabricated with weld tacks and grinding down the excess metal to reveal any missed spots. The grinding took some time (even with a 36-grit sanding disc on the pneumatic die grinder), but I took it down to a manageable level. Grinding away at the metal also cleaned up the surface for further welding, but that didn’t stop my dad from making of mess of my hard work…

Now that we’d moved to a smaller guage wire (from .030 to .024), Dad discovered that it was possible to lay a continuous bead along the sheet metal. Dad’s zealous trigger finger, combined with the fact that grinding made the metal thinner and that one of us had accidentally bumped the wire-feed dial from 30 to 40, led to numerous blowouts. By the time I had stopped him from wreaking havoc on my car, Dad had managed to place a few sizable holes in the place of what had just been smooth, clean welds. It was time to leave before we got a chance to perform any repair work, so at least I have a plan for my next jaunt at TLG.

Expect a much more frequent posting schedule in the upcoming months. I plan to visit during the week whenever possible, and every weekend.


October and November have been somewhat slow and lonely at TLG.  Jack and I finished a thorough cleaning of the bare Mustang unibody after having stripped all the paint from the body and we acid-etched the carcass for basic metal preservation and rust prevention while we go through the next few prep steps.

And that’s when Jack’s cross-country season and college applications kicked in…

While I’m glad Jack has his priorities in the proper order, I’m not spending as much time in the garage now that Jack’s been really busy.  I will be back in the garage the 2nd week of December to get the Mustang seams “leaded” and perhaps even replace the rear quarter panels while Jack’s busy with other (more important) activities.

I hope he is pleasantly surprised with the progess when he comes up for air.

In other exciting news: Three Lions Garage has its first British occupant on the way since we sold the ’55 Elva and ’35 Morgan three wheeler.  While visiting the Classic  Motor Show at the 2,000,000 square foot National Expo Centre Birmingham two weeks ago I met several interesting groups of like-minded gearheads.  The show is the largest classic auto event in the UK and it’s safe to say it’s BIGGER THAN HUGE!  I can’t accurately describe how big it is other than to tell you that I ended up walking 9 miles (!) in about 6 hours at the show.

I browsed the vendors section (in which they were selling everything new and used related to classic cars) and met with  fellow members of the Citroen Car Club ltd, the 2CV club and the Messerschmitt Owners Club.  I took the opportunity to visit with Andy at the stall rented by Hortons Books, my absolute favorite rare and new automotive book dealer, run by Ben Horton and his wife Jennifer.   I found some mirrors for the ’27 Rally and also procured some hurricane hats and goggles for Jack and me to use in the upcoming California Mille.  But I digress…

Near the end of my visit I saw three beautiful vintage Land Rovers owned by members of the Birmingham Land Rover Group, a motley crew of spirited Land Rover enthusiasts.  They couldn’t have been more friendly and were quite a fun bunch.  I started speaking with one of their members, a retired R&D engineer at Land Rover and within an hour I was the proud new owner of a 1978 Land Rover Series 3 Safari edition 109 Estate.  This acquisition solved my “holiday gift for Linda” conundrum.  She will be ecstatic—or so I hope…

business end of Linda’s holiday gift
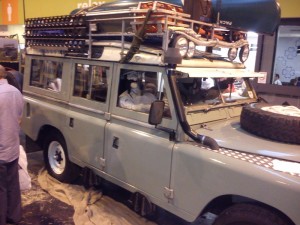
crash dummy and canoe not included
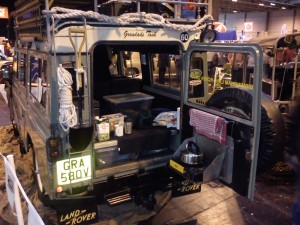
Grandad’s Tank

This multiple-award-winning car has only 38,000 original miles on the odometer, is fully loaded with every available option and was sold fully “kitted out” with all the bits shown (including roof rack, sand ladders, jerry cans and spare water tank) but sans canoe. Even more desirable is that this vehicle has been under the loving care of a very talented retired Land Rover engineer, and getting to know Ken has been the most enjoyable element of the entire experience.

Linda’s “new” car sailed from Southampton, UK on a roll-on/roll-off vessel which is due in Port Hueneme, CA at the end of this month. I can hardly contain my excitement.


Next Steps

Posted October 2, 2012 By jack

I would have liked to finish my restoration project by January 7, 2013 (the last day of winter vacation), but that’s simply not going to happen. Between cross country practices and meets, school work, college applications and essays, it’s a minor miracle that I still find time for optional items like a decent nights sleep or a social life. My courseload and team committments kept me out of the garage much of last year and this year I want to do a better job of scheduling my time to fit in more wrench time.

As a start, I compiled a list of what’s left in the restoration:

  1. Finish cleaning the car. This will be done step by step, starting with the underside and working our way around.
  2. Prep the bare metal using an acid etch to prevent rust and for better paint adhesion.
  3. Lead in the left quarter panel and other exposed seams.
  4. Prime the sheet metal, using weldable primer on the areas where we plan to replace sheet metal.
  5. Repair rust spots in the battery tray and frame rail (something we started before re-prioritizing).
  6. Replace the sheet metal in the quarter panels. The replacement skins arrived in a ginormous box, so we can now get those hideous side scoops off.
  7. Repair bad repairs in roof and engine compartment.
  8. Paint underside of the car before continuing to step 9…
  9. Weld in chassis reinforcements and roll cage.
  10. Determine if doors need work and strip door trim.
  11. Install suspension and wheels to get the car rolling again.
  12. Tow it to Precision Auto Body, have it painted, and begin reassembly.

While it’s not very detailed, I’ll use this list as a high level sequence to guide me through the next few steps while I flesh this out into a more detailed plan for the rest of the project.

Onward!


A job weld done

Posted September 12, 2012 By jack

With the car stripped of primer, cleaned of glass, and ready for bodywork, Dad and I took some time off to work on another important task, something that would have to be finished before we could continue any further: teaching me to weld.

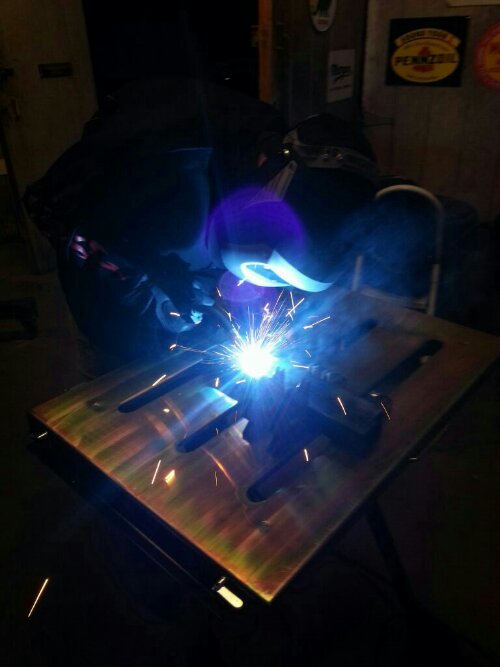
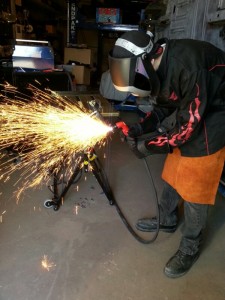
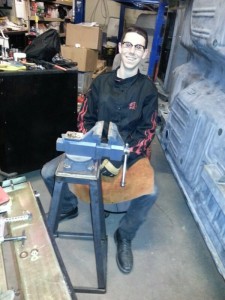
Dad figured that as long as I needed some metal to practice on, I should make something useful in the process, so he drove down to Maxx Metals in San Carlos and picked up a few angle irons with which we built a stand for our bench vise. He has a nice Hobart MIG welding unit that was just right for our purposes. After making me watch a short instructional video and giving me some basic pointers, Dad let me start practicing on some scrap before we started assembling the stand. Dad came up with a design for a square base with 16 in. sides and a platform with 8 inch sides connected by 4 angle irons of 30 inches. Some quick trigonometry showed that the 30 inch pieces would have to be angled in at 79.1311°, so we rounded up to 80 and pulled out the plasma cutter, which proved extremely useful for cutting our 6 gauge steel. With the legs cut to the correct angle, we used a grinding wheel to clean up the metal before welding, threw on a few tack welds to hold the structure in place, and finished welding together the stand.

With that project completed, we moved back to the Mustang. With only two spots of serious rust on the car, we decided to start by replacing those. We pulled the plasma cutter back out and excavated the battery tray, which looked like Swiss cheese. We may decide to place the battery in the trunk later on, but the corrosion would have to be removed regardless. I smoothed out and cleaned up the edges with a grinding wheel while Dad used some posterboard to make a stencil for cutting new sheet metal. Dad trimmed and bent the metal until the fit was good, pulling out the body hammer to really lay down the edges for a close fit. We pulled out the welder, and I started by laying a few tack welds to keep it in place. However, I had never welded anything thiner than 3/16 inch, and when I went to lay down a bead, I blew through the metal pretty quickly. Dad did the best he could to patch up what I had done, and then I went back to placing tacks to avoid making the matter worse. Sometime soon I’ll grind down the welds and see which ones need replacing or reinforcing. Hopefully it’s not too ugly.


Stay tuned for…

Posted August 21, 2012 By dad

High Voltage hi-jinks

image

learning to weld

fun with the plasma cutter

proud of the vise stand fabricated for TLG


The Night Shift

Posted August 4, 2012 By dad

because of our busy schedules, we fit the work in when we can.  This has caused us to institute the Three Lions Garage night shift.  The funny thing is…it’s our only shift lately.  As they say: “You gotta do what you gotta do”.